> ## Documentation Index
> Fetch the complete documentation index at: https://www.presolve.com/docs/llms.txt
> Use this file to discover all available pages before exploring further.
# Build and publish a custom intake
> Create questions and assign the published intake to the intended case types.
Open [Settings → Custom Intake](https://attorney.dearlegal.com/dashboard/settings?tab=intake). Before publishing, decide which case types should use the form. Assignment affects the form used when cases are created or viewed.
## Build the form
1. Select **New Intake Set**, enter its name and description, and select the intended case type.
2. In the builder, choose **Client**, **Incident**, or **Administrative**.
3. Use **New Subsection** to group related questions.
4. Select **Add question** and choose its type, label, help text, and required setting.
5. Save the question and verify its placement in the outline.
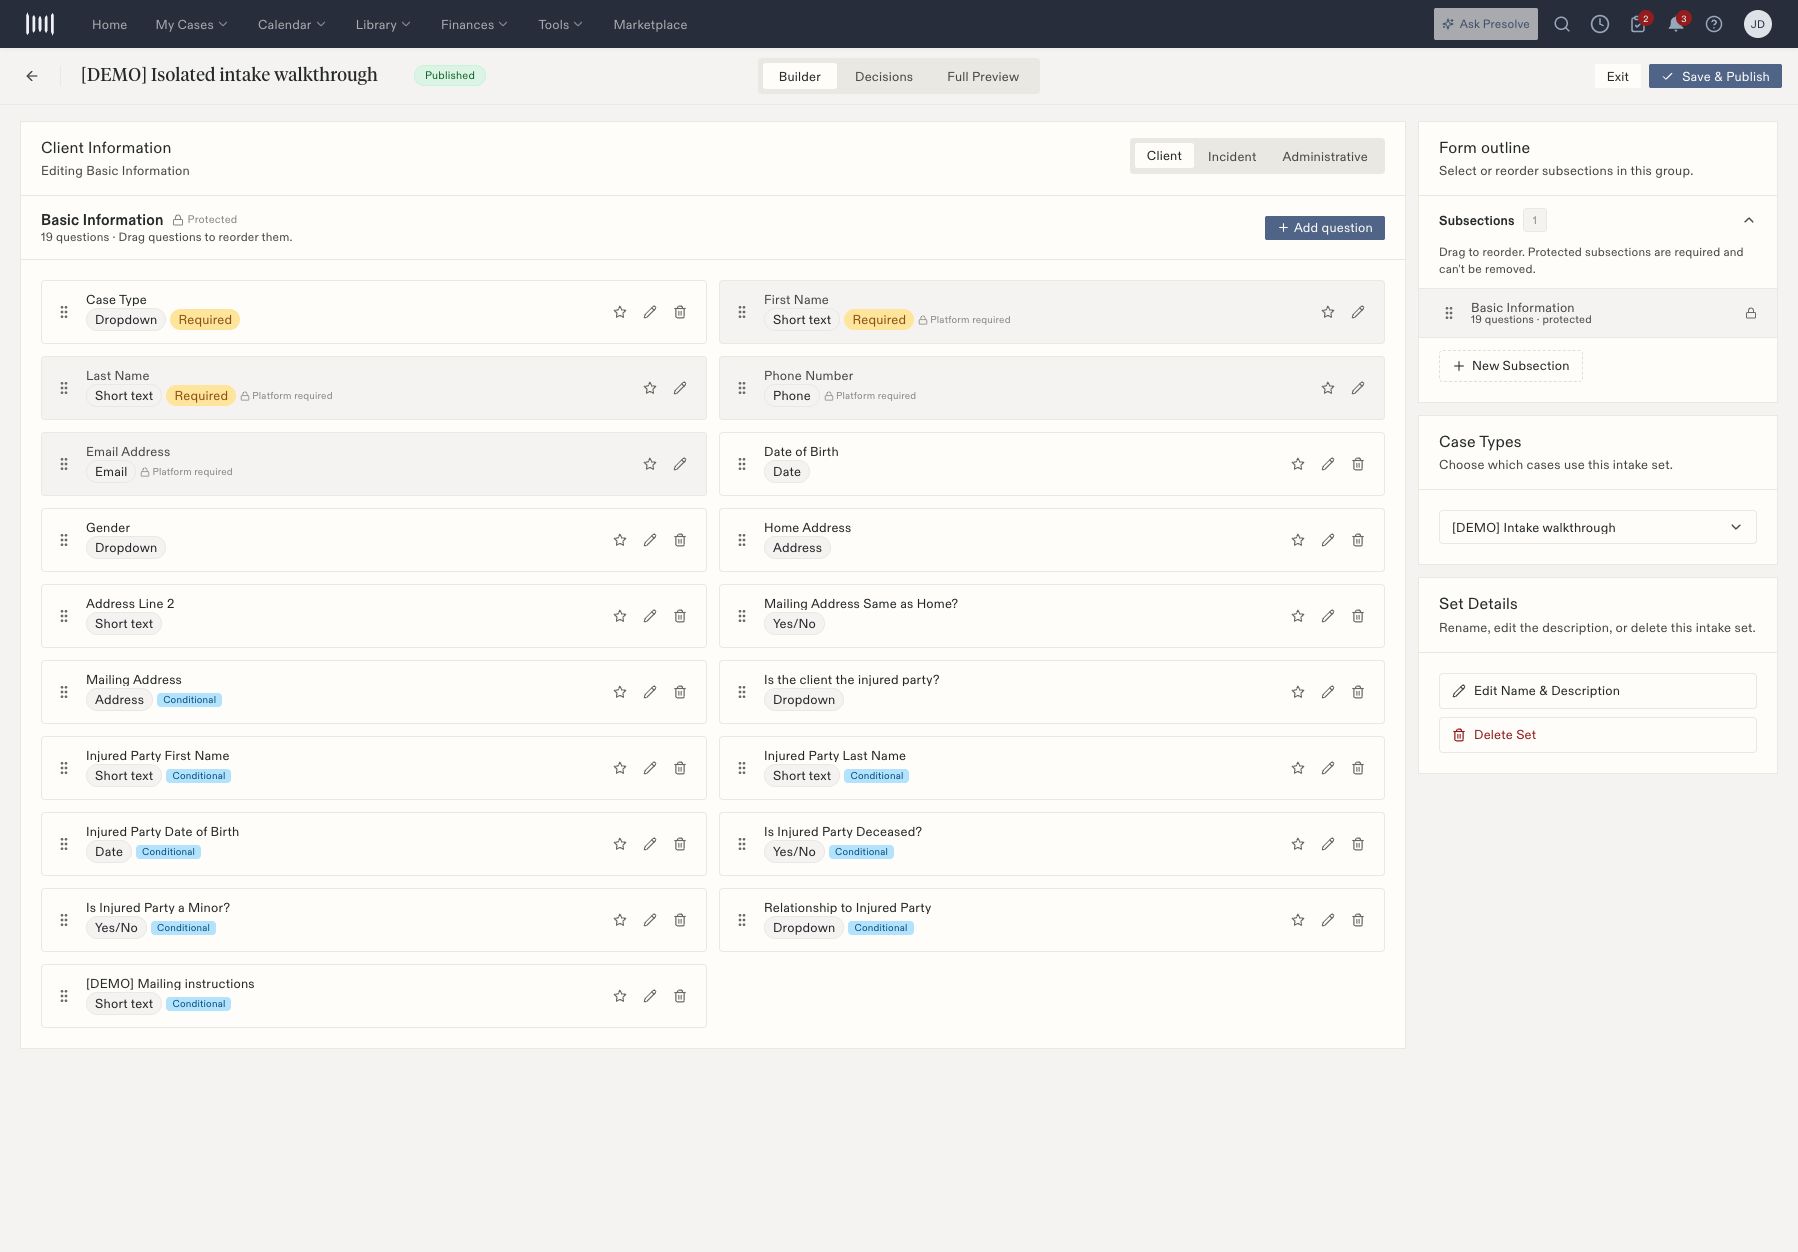 Protected identity fields and subsections cannot be removed. A question's **Field Name** identifies saved answers and cannot be changed after creation. Choose it carefully; the visible question label is a separate field.
## Publish to the right case types
1. Review the form with **Full Preview**.
2. Select **Save & Publish**.
3. Inspect the case-type assignment in the confirmation dialog. Clear unintended selections.
4. Select **Publish** and check the confirmation and published version.
5. Create a test case of the assigned type through **My Cases → Upload Case** and confirm the intended form loads.
6. Save the test case, then read its intake answers to verify persistence.
Use a separate test case type when you need to validate a form without replacing an existing practice intake. The attorney-only example does not establish what a client portal displays.
Next: [Conditional questions](/docs/help/admin/intake-conditions) and [custom matter checklists](/docs/help/matters/checklists).
## Choose a question type
The builder offers the following question types. Choose the type that fits the answer you need, then check its settings in the question editor.
| Type | Example use |
| - | - |
| Short Text | A brief reference or instruction |
| Long Text | A narrative explanation |
| Yes/No | A two-choice answer that may control a follow-up question |
| Dropdown | One choice from a defined list |
| Multi-Select | More than one applicable choice |
| Date | A date relevant to the intake |
| Email | An email-address answer |
| Phone Number | A telephone-number answer |
| Currency | A monetary amount |
| Number | A numeric answer |
Existing intake sections can also include protected identity and address questions. Review the editor's protection indicators before planning changes to those fields.
## Review question settings separately
**Label** is the text the person completing the intake reads. **Help text** explains what to enter, while **Placeholder** provides a hint inside the input. Use a plain-language label and put additional instructions in help text.
**Field Name** is a unique organization-wide identifier generated from the label. It can be locked after creation. Check it before saving a new question and do not assume changing the visible wording will change the underlying identifier.
**Required** controls whether the question must be answered. **Conditional visibility** controls when it appears. Optional answer rules control actions associated with answers. Review each setting independently.
## Organize and preview the intake
Use the Client, Incident, and Administrative areas and their subsections to keep related questions together. Place a controlling question before its dependent follow-up; the condition picker offers earlier questions.
In **Full Preview**, inspect the order, subsection labels, question types, and Conditional indicators. Then test the actual answer interaction after assigning the intake to an appropriate test case type.
## Publish to the intended case types
**Save & Publish** opens a separate assignment review. Inspect the selected case types before selecting **Publish**: the assignment is used when creating or viewing cases of those types.
For an isolated demonstration, create a dedicated case type and assign only that type. Verify the confirmation states the expected number of assignments and that the intake library shows the published version.
An **Attorney Only** case type is described by the creation screen as hidden from admin/intake portals. An attorney-side test therefore does not establish what a public or client portal will show.
## Verify the saved case
1. Open **My Cases → Upload Case** and select the assigned case type.
2. Confirm the intended intake sections load.
3. Exercise both answers of a conditional question.
4. Enter a recognizable test answer and complete the intake.
5. Review the final action: **Save** and **Save & Send to RingCentral** are distinct choices where offered.
6. Open the created case and check that the saved answer appears in its intake information.
Use [conditional-question testing](/docs/help/admin/intake-conditions) for the show/hide example and [matter checklists](/docs/help/matters/checklists) for reviewing the answers after intake.
Protected identity fields and subsections cannot be removed. A question's **Field Name** identifies saved answers and cannot be changed after creation. Choose it carefully; the visible question label is a separate field.
## Publish to the right case types
1. Review the form with **Full Preview**.
2. Select **Save & Publish**.
3. Inspect the case-type assignment in the confirmation dialog. Clear unintended selections.
4. Select **Publish** and check the confirmation and published version.
5. Create a test case of the assigned type through **My Cases → Upload Case** and confirm the intended form loads.
6. Save the test case, then read its intake answers to verify persistence.
Use a separate test case type when you need to validate a form without replacing an existing practice intake. The attorney-only example does not establish what a client portal displays.
Next: [Conditional questions](/docs/help/admin/intake-conditions) and [custom matter checklists](/docs/help/matters/checklists).
## Choose a question type
The builder offers the following question types. Choose the type that fits the answer you need, then check its settings in the question editor.
| Type | Example use |
| - | - |
| Short Text | A brief reference or instruction |
| Long Text | A narrative explanation |
| Yes/No | A two-choice answer that may control a follow-up question |
| Dropdown | One choice from a defined list |
| Multi-Select | More than one applicable choice |
| Date | A date relevant to the intake |
| Email | An email-address answer |
| Phone Number | A telephone-number answer |
| Currency | A monetary amount |
| Number | A numeric answer |
Existing intake sections can also include protected identity and address questions. Review the editor's protection indicators before planning changes to those fields.
## Review question settings separately
**Label** is the text the person completing the intake reads. **Help text** explains what to enter, while **Placeholder** provides a hint inside the input. Use a plain-language label and put additional instructions in help text.
**Field Name** is a unique organization-wide identifier generated from the label. It can be locked after creation. Check it before saving a new question and do not assume changing the visible wording will change the underlying identifier.
**Required** controls whether the question must be answered. **Conditional visibility** controls when it appears. Optional answer rules control actions associated with answers. Review each setting independently.
## Organize and preview the intake
Use the Client, Incident, and Administrative areas and their subsections to keep related questions together. Place a controlling question before its dependent follow-up; the condition picker offers earlier questions.
In **Full Preview**, inspect the order, subsection labels, question types, and Conditional indicators. Then test the actual answer interaction after assigning the intake to an appropriate test case type.
## Publish to the intended case types
**Save & Publish** opens a separate assignment review. Inspect the selected case types before selecting **Publish**: the assignment is used when creating or viewing cases of those types.
For an isolated demonstration, create a dedicated case type and assign only that type. Verify the confirmation states the expected number of assignments and that the intake library shows the published version.
An **Attorney Only** case type is described by the creation screen as hidden from admin/intake portals. An attorney-side test therefore does not establish what a public or client portal will show.
## Verify the saved case
1. Open **My Cases → Upload Case** and select the assigned case type.
2. Confirm the intended intake sections load.
3. Exercise both answers of a conditional question.
4. Enter a recognizable test answer and complete the intake.
5. Review the final action: **Save** and **Save & Send to RingCentral** are distinct choices where offered.
6. Open the created case and check that the saved answer appears in its intake information.
Use [conditional-question testing](/docs/help/admin/intake-conditions) for the show/hide example and [matter checklists](/docs/help/matters/checklists) for reviewing the answers after intake.